Drywall Repair After Pets: Claw Scratches, Chewed Corners and Lean Lines
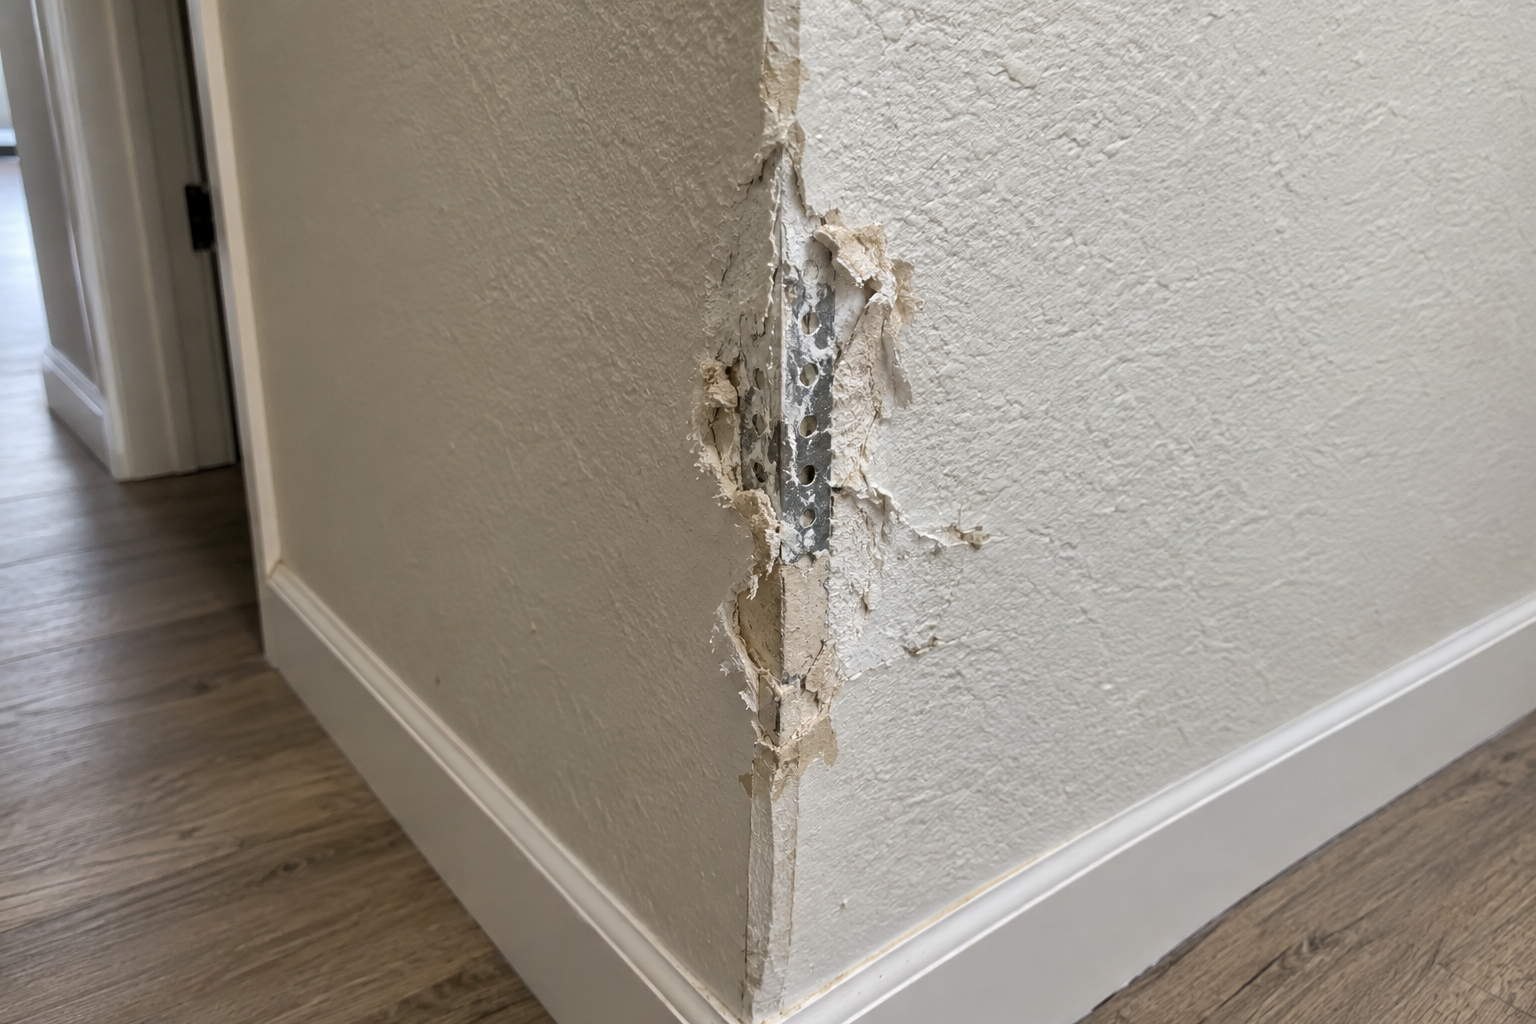
Anyone who has shared a house with a dog, a cat or a determined rabbit knows the walls keep a record. There is the scuffed band at shoulder height along the hallway where a big dog leans as it walks. There is the corner by the back door that a puppy decided to chew during its second month. There are the claw grooves on the door jamb and the drywall beside it, left by a dog who is sure someone is about to come home.
This kind of damage is common enough that repair crews see it every week, and it has its own patterns. It rarely looks like the neat round hole from a doorknob. It is shallow, spread out, often concentrated in one area, and it usually sits on a wall that already has a texture, whether that is orange peel, a light skim or a knockdown finish. That last detail matters more than most people expect, because the texture is where a repair either disappears or announces itself.
Why pet damage is its own category
Most drywall damage is a single event. Something hits the wall, a pipe leaks, a screw pops. Pet damage is repetitive. The same animal returns to the same spot, so the damage builds in layers, and a quick patch that looks fine on day one can be scratched back open within a week if the reason the animal targets that spot is not dealt with.
It is also usually low on the wall, which is good news. The lower third of a wall is less visible under overhead light and is often partly hidden by furniture. It is also where baseboard, chair rail or a wainscot panel can be used to cover the worst of it permanently, which is not an option for damage at eye level.
The five patterns you will usually find
Claw scratches on doors, jambs and nearby walls
These are the most common. A dog scratching to be let in or out works the lower half of the door and whatever drywall sits beside the jamb. On drywall, shallow scratches only tear the paper face. Deeper ones gouge into the gypsum core and leave loose, fuzzy paper along the edges.
The key to repairing torn paper is to never skim compound straight over it. Loose paper fibers swell when they absorb the water in joint compound, and they raise bubbles and fuzz that show through paint. The torn paper has to be cut back to where it is firmly bonded, and the exposed brown layer sealed with a shellac based or oil based primer before any compound goes on.
Chewed outside corners
Puppies and some rabbits love an outside corner. It is at mouth height, it has a satisfying edge, and it gives a little. The damage goes past the paper and usually into the metal or paper faced corner bead that protects the edge.
Once the bead is chewed or bent, filling over it does not hold. The damaged section of bead has to be cut out and replaced, with the new piece fastened and bedded in compound, then feathered out along both faces of the wall. Where chewing is likely to happen again, a clear plastic corner guard fixed over the finished repair is cheap and very effective, and it is far easier to replace than the corner itself.
The lean line
Large dogs often walk pressed against one wall of a hallway or a stairwell. Over months, this leaves a greasy, darkened band and sometimes a slightly worn surface. This is mostly a cleaning and paint problem rather than a structural one. The oils in fur and skin have to be removed with a degreasing cleaner before anything else, because paint and compound will not bond to them. After cleaning and priming with a stain blocking primer, most lean lines can simply be repainted.
If the band returns constantly, a scrubbable paint finish such as satin or eggshell on that wall makes future cleaning far easier than a flat finish, which tends to burnish and hold marks.
Gouges and small holes from crates and gates
Pressure mounted pet gates and wire crates pushed against walls leave small dents, circular crush marks and the occasional hole. These behave like ordinary small damage. Crushed gypsum is scraped out until the edges are solid, then filled in thin layers. A setting type compound, the kind mixed from powder that hardens chemically rather than by drying, is useful for the first fill in anything deeper than a thumbnail, because it shrinks less and hardens faster.
Moisture damage low on the wall
Water bowls that get tipped, aquarium stands, litter areas and accidents from an older pet can soak the bottom few inches of drywall repeatedly. The board can feel soft, the paper may bubble, and there may be a smell that returns after cleaning.
This is the one pattern that should not be patched over. Drywall that has been wet repeatedly loses its strength and can harbor mold on the back face where you cannot see it. The usual fix is to cut out a strip along the bottom of the wall above the damage, check the framing and the bottom plate behind it, let everything dry thoroughly, then install new board and finish it. Because this damage sits just above the floor, the new seam can often be tucked right under the baseboard line.
Getting the texture to match
On a smooth wall, a pet repair is mostly about careful feathering and priming. On a textured wall, the repair has an extra stage, and it is the stage most people underestimate.
The texture has to be recreated on the patch before painting, and it has to match both the pattern and the size of the pattern already on the wall. Orange peel is sprayed in fine droplets and left alone. A knockdown finish is sprayed or splattered in larger blobs, allowed to set for a short time, then flattened lightly with a wide knife so the tops are knocked down into flat islands. Skip trowel is applied by hand in irregular swipes.
The mistakes that give a repair away are predictable. The droplets are the wrong size, the spacing is too dense or too sparse, or the knockdown pass is made too early or too late so the islands look either smeared or peaked. Practising on a scrap of drywall or a piece of cardboard until the pattern matches the wall is not a waste of time, it is most of the job. Aerosol texture cans work for small areas but are hard to control across a larger patch. Hopper guns give more consistent results for anything wider than a hand.
After the texture dries it has to be primed, not just painted, because fresh compound absorbs paint differently from the old painted surface around it and will show as a dull or shiny patch. That effect is called flashing, and the cure is to prime the repaired area and then repaint the wall from corner to corner rather than dabbing paint onto the patch alone.
Fix the reason, or the repair will not last
A drywall repair on a spot a pet targets is only half the job. Scratching at a door usually means the animal wants to get through it, so a pet door, a change in where the animal waits, or a kick plate on the door and a guard on the nearby wall section will stop the cycle. Chewing corners is usually a stage of puppyhood, boredom or teething, and chew toys plus a corner guard handle it. A lean line is simply how that dog walks, so cleanable paint is the practical response. Moisture at the base of a wall points to a bowl, a tank or a litter setup that needs a tray or a waterproof mat beneath it.
Where damage keeps recurring along a whole run of wall, a durable wainscot, beadboard panel or a taller baseboard can be a better long term answer than repairing the same drywall every season. It covers the vulnerable zone with a material that shrugs off claws and cleans easily.
When to do it yourself and when to hand it over
Small scratches, a lean line and a couple of crate dents on a smooth wall are well within reach for a careful homeowner with a sanding sponge, a putty knife, a tub of lightweight compound and a stain blocking primer. The work is slow rather than difficult.
The situation changes when several of these come together. A repaired corner bead, textured walls, damage spread across a long stretch of hallway, or any sign of repeated moisture near the floor all push the job toward someone who does drywall repair regularly. The difference is less about skill with a knife than about matching texture across a large area so the whole wall reads as one surface, and about recognizing when damaged board needs to come out rather than be covered.
It also helps to plan the work around the animal. Fresh compound and primer need to cure before a dog leans on them or a cat investigates them, so a repair done while the pet is boarded, or while that part of the house is closed off for a day or two, tends to survive far better than one done with a curious nose watching.
A short checklist before you start
- Identify which of the patterns you are dealing with, since each has a different first step.
- Cut back torn paper to firm edges and seal the exposed layer before any compound.
- Replace damaged corner bead rather than filling over it.
- Degrease lean lines before priming.
- Cut out, dry and replace drywall that has been wet more than once.
- Practise the texture on scrap until it matches the wall.
- Prime every patch, then repaint the full wall.
- Change whatever draws the pet to that spot, or protect it.
Walls in a house with animals will never look like a show home for long, and that is fine. What makes the difference is repairing them in a way that holds up, and dealing with the habit behind the damage so the same patch is not needed again next month.
Need help in Riverside?
Call (951) 515-1943